The Form Builder feature in iECHO offers an easy way to create and manage forms. It allows you to create customized assessments, surveys, and feedback forms. You can preview your form in real time, ensuring it meets your needs before publishing. This feature seamlessly integrates with iECHO’s data management system, enabling efficient collection, analysis, and reporting of responses.
There are three components to Forms:
| Components | Description |
|---|---|
| Basic Details | Define the form ‘Title’ and add the banner image |
| Add Questions | Build a questionnaire using twelve different types of questions |
| Responses | Real-time answers submitted through the form |
The Type of forms you can create on iECHO:
| Form Type | Description |
|---|---|
| Pre Assessments | Evaluate participants’ knowledge before starting the participant group/session. |
| Post Assessments | Evaluate participants’ knowledge after completion of the participant group/session. |
| Program Registration Form | Capture additional participant information beyond the basic iECHO registration. After registering on iECHO, participants will be prompted to fill out this form. Completing the form is mandatory for participation; participants will not be able to attend the session without submitting it. Only one Program Registration form can be created for each participant group. |
| General Survey Form | Capture any other information from participants. |
| Case Presentation Form | Capture case presentation data from participants. |
Different kind of question types available in the form builder:
| Question Type | Description |
|---|---|
| Short Answer | Open-ended questions requiring participants to provide a concise response within 50-100 words |
| Long Paragraph | Open-ended questions requiring a detailed response within 500-1000 words |
| Date | A question type where participants select a date from a calendar |
| Number | A question type where participants provide a numeric value as their answer |
| Upload File | Enables users to upload a file as their response. It is typically used when collecting documents, images, or other media as part of a form, survey, or submission process. |
| Scale Rating | A closed-ended question that allows respondents to provide feedback on a rating scale (e.g., rate the session from 1 to 10, with 10 being the highest) |
| Single Select | A multiple-choice question where participants can select only one correct answer |
| Multiselect | A multiple-choice question where participants can select multiple correct answers |
| Single Select & Remarks | A multiple-choice question where participants select one answer and optionally provide additional comments |
| Multiselect & Remarks | A multiple-choice question where participants select multiple answers and optionally provide additional comments |
| Single Select Grid | Allows respondents to select one answer per row from a set of predefined options in a grid format. |
| Multi Select Grid | Allows respondents to select multiple answers per row from a set of predefined options in a grid format. |
Creating a Form
Here’s how you can create a form on iECHO:
- Navigate to your iECHO Homepage.
- Navigate to Programs page by clicking on
View more. - Select the Program for which you want to create forms in a Participant Group.
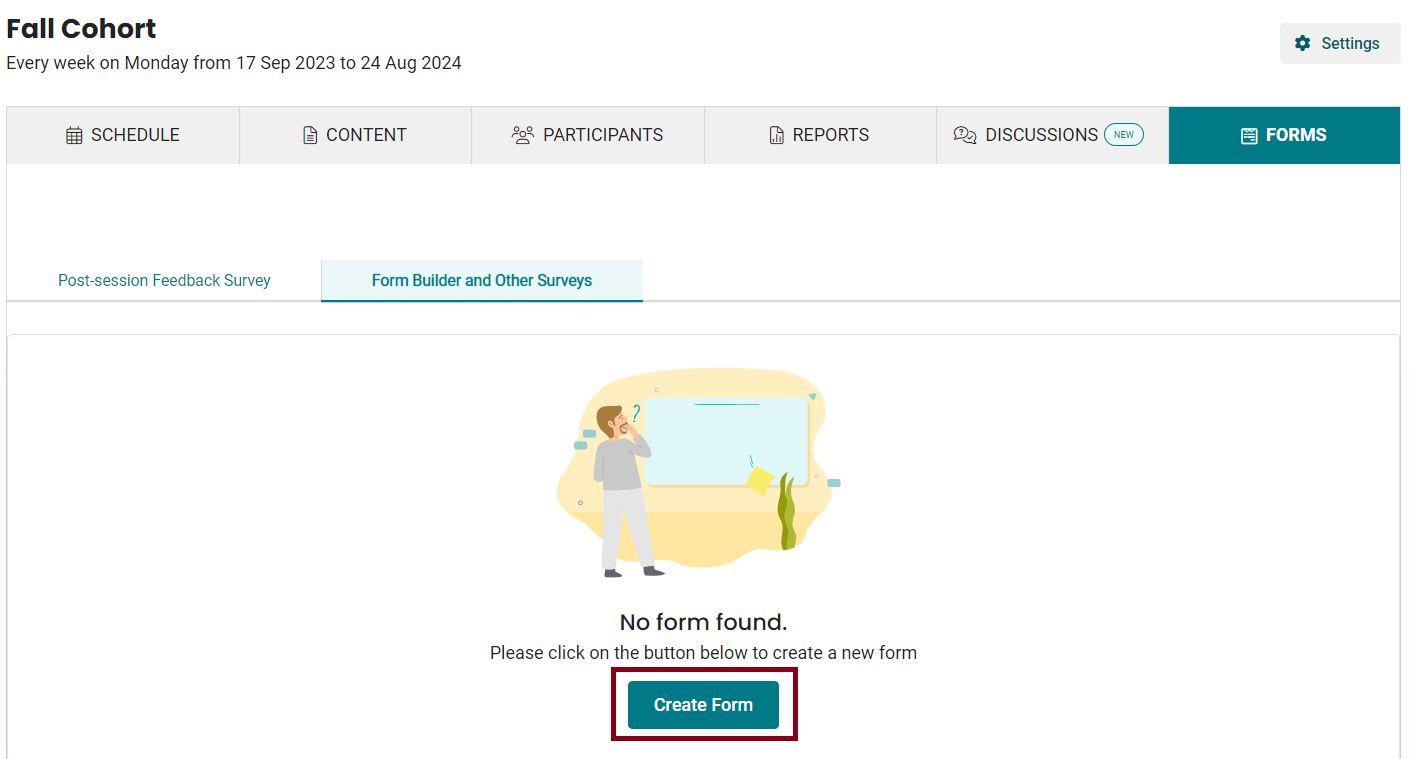
- Go to the
Formssection, and selectForm Builder and Other Surveys. - Click on the
Create Formbutton.
- Select the form type from the list.
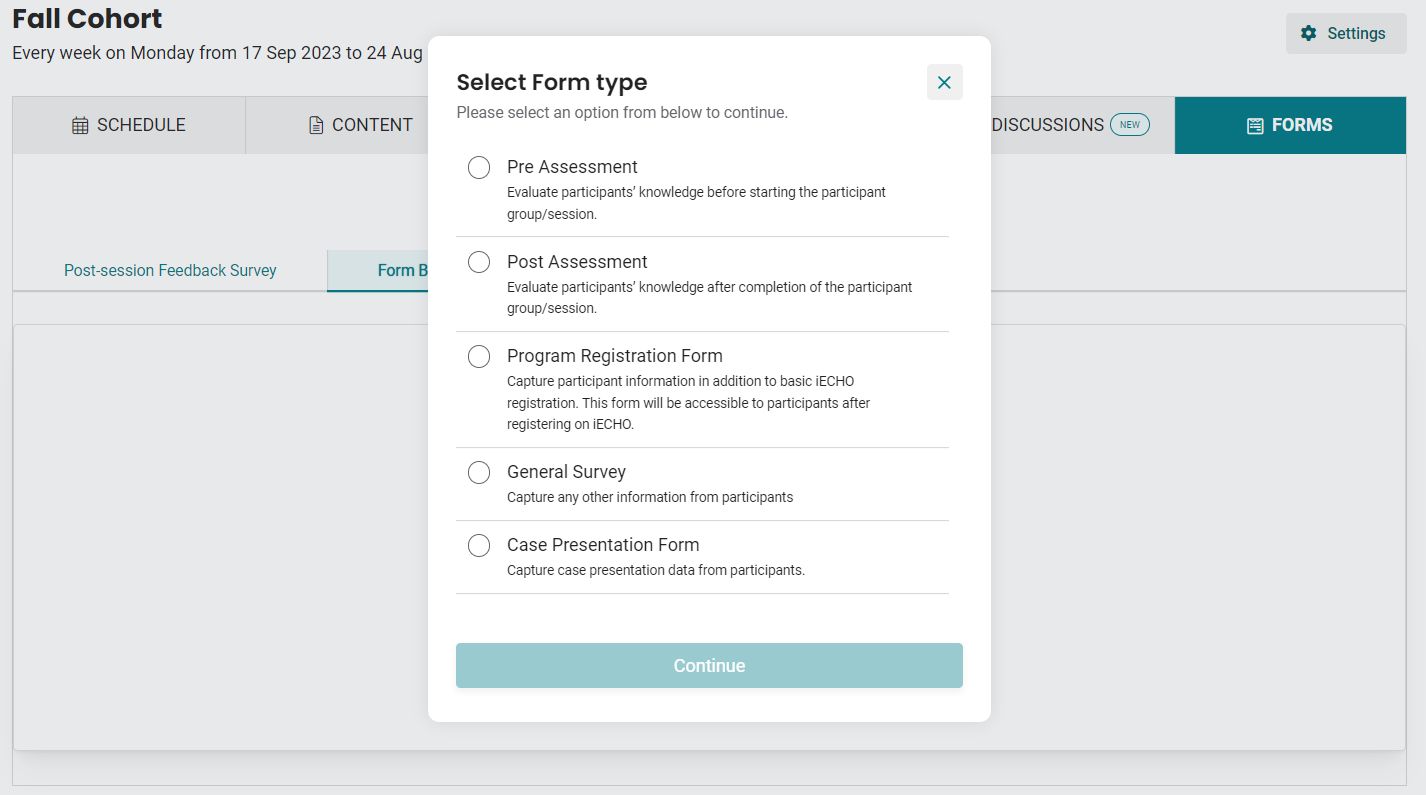
- After selecting, iECHO will prompt you with an option to
Create NeworCopy Assessment From - Click on
Create newand iECHO will redirect you to a form builder.
Components of the Form Builder
Let’s take an example and learn how to create a form:
University of Psychological Sciences is an organization dedicated to the comprehensive study and advancement of the field of psychology. They are running a program called ‘Master of Science in Autism Diagnosis and Intervention for Adults ECHO program’ designed to equip students with the knowledge and practical skills needed to diagnose and provide effective interventions for adults with autism spectrum disorder (ASD).
They want to create a pre assessment form to assess the knowledge of participants before the session.
Basic Details
- Mention the Form
Titleand also add aDescriptionstating the purpose or details of the form. - Add the
Cover Imageof the form, the cover image is a visual introduction to the form, setting the tone and improving engagement. It appears at the top of the form and helps:
1. Establish Context & Branding
- Reinforces brand identity with logos, colors, and themes.
- Visually conveys what the form is about (e.g., conference, webinar).
- Adds a creative touch to make the form more engaging.
2. Improve User Experience & Engagement
- A well-designed header makes the form visually appealing and less intimidating.
- It creates a sense of trust by making the form look professional.
- Users are more likely to complete a form when it feels polished and welcoming.
Best Practices for Google Forms Header Images
✅ Recommended Size- 458px x 216px, not larger than 5 MB.
✅ Image formats - JPEG, PNG or SVG accepted
✅ Keep it simple: Avoid too much text; let the image complement the form’s purpose.
✅ Match your theme: Align colors and visuals with the form’s intent.
✅ Ensure readability: Make sure the image doesn’t distract from the form fields.
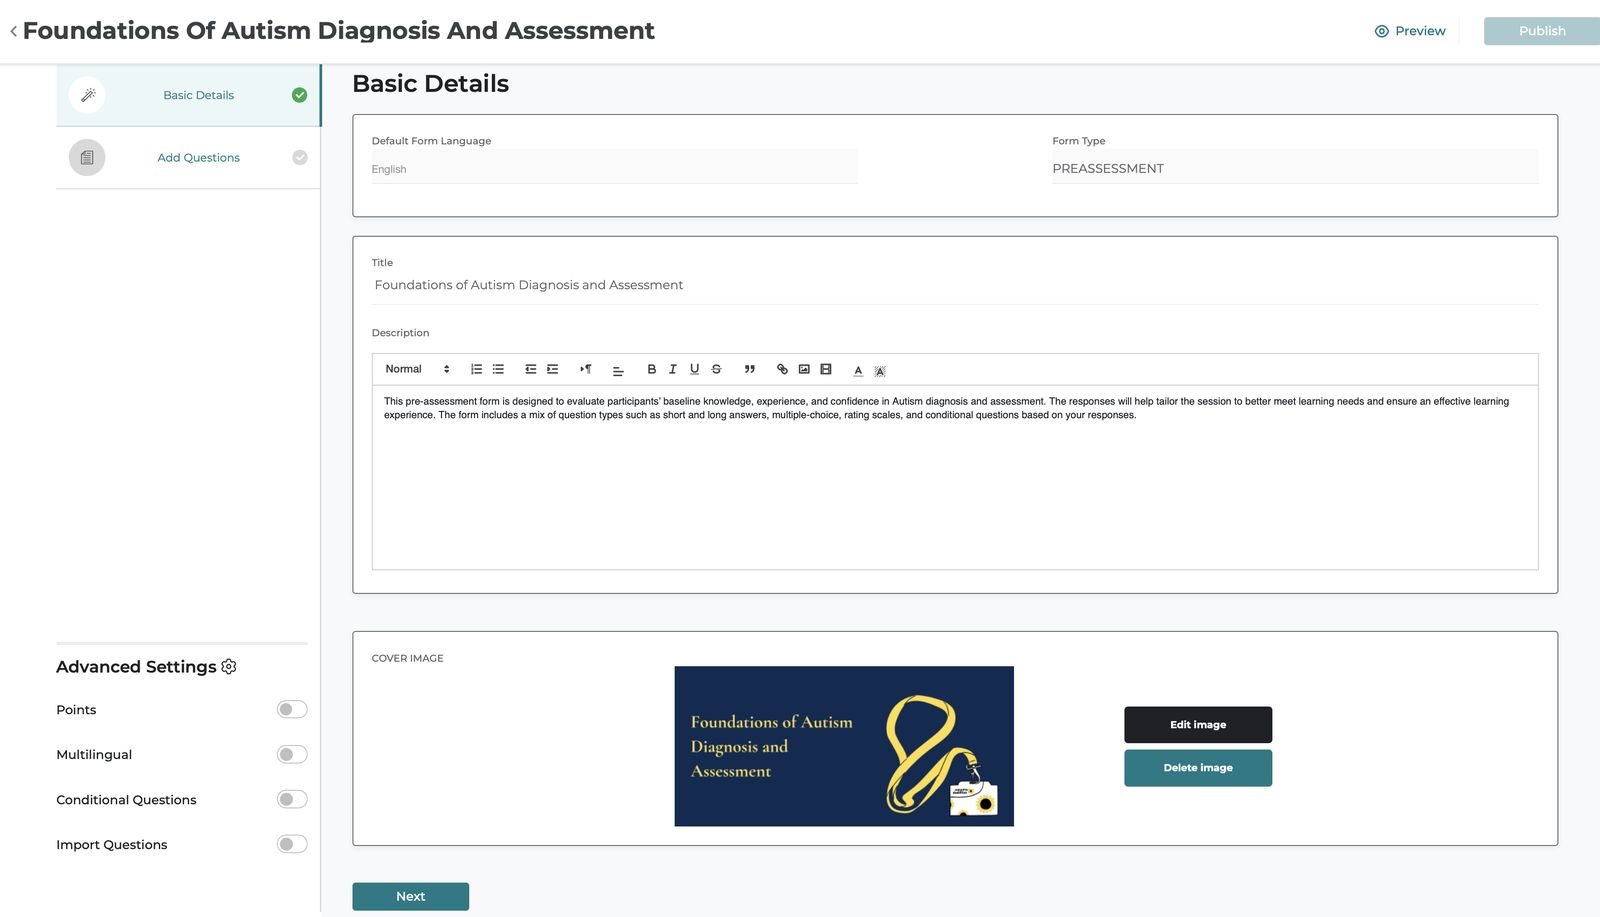
Let’s name the form as Foundations of Autism Diagnosis and Assessment, and add a short description and cover image.
Note
- Default Form Language and Form Type are two non-editable fields.
- Cover Image is not a required field.
Add Questions
- If there are multiple form sections, edit the name of the section by clicking on the
editbutton given in the three dot drop down.

you can add a name and short description about the section.
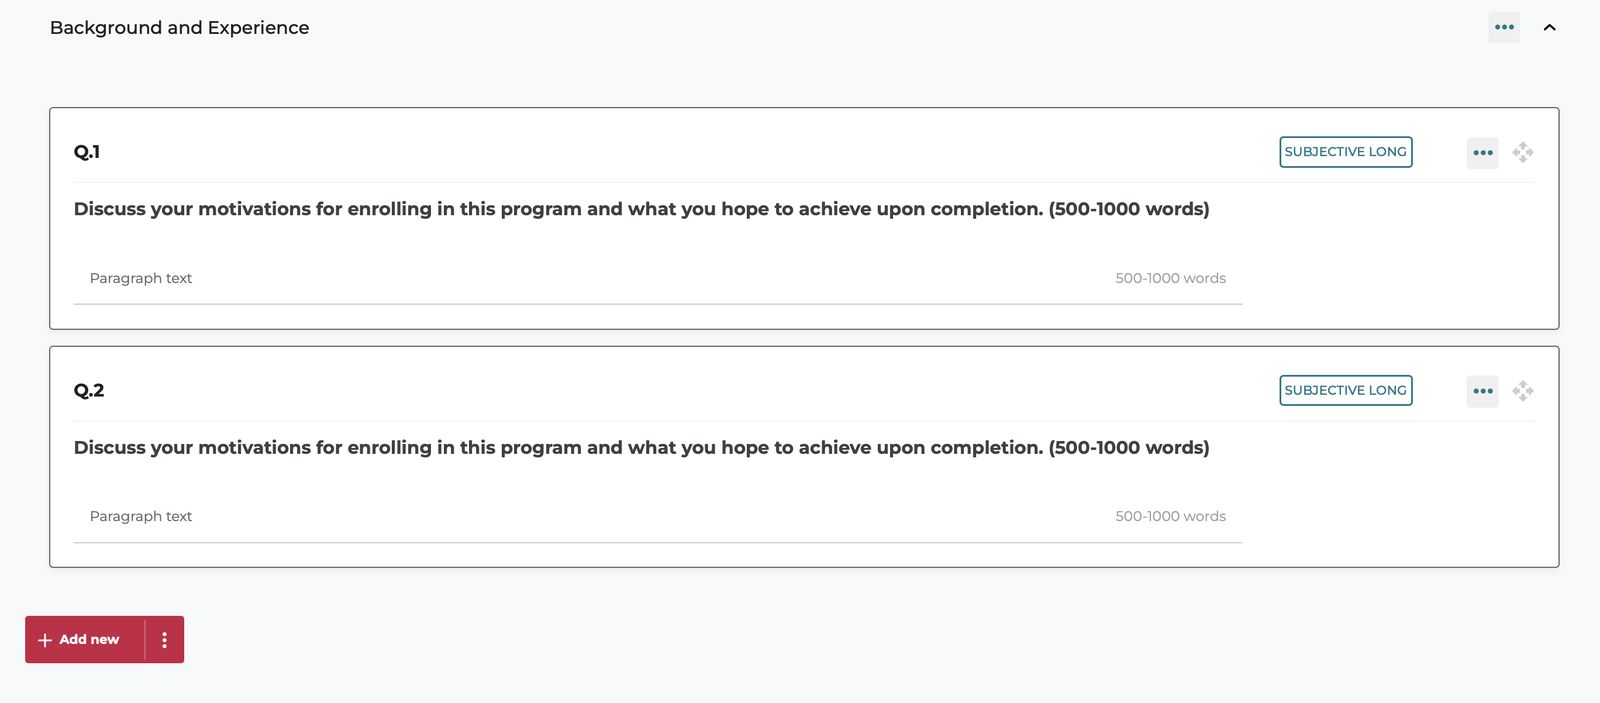
Here we’ve renamed section 1 as Background and Experience.

In this section let’s add two types of questions short answer and long answer:
- Add the
Question textand ashort descriptionof the question if required. - Select a
Question type. - Click on
Save. - To add another question click on
Add New.
Let's create another section in the form and rename it as Understanding Autism Spectrum Disorder
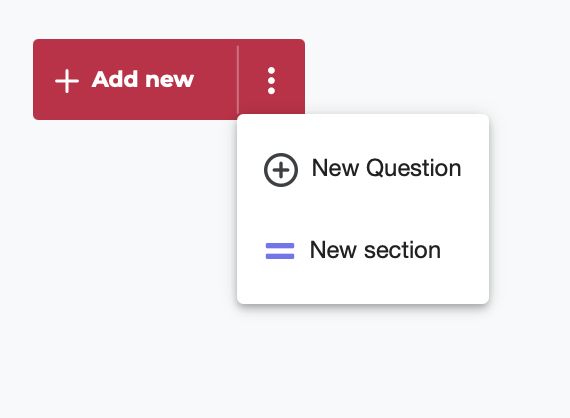
To add another section:
- Click on the three dot menu and select
New Section. To rename click onEditand rename.
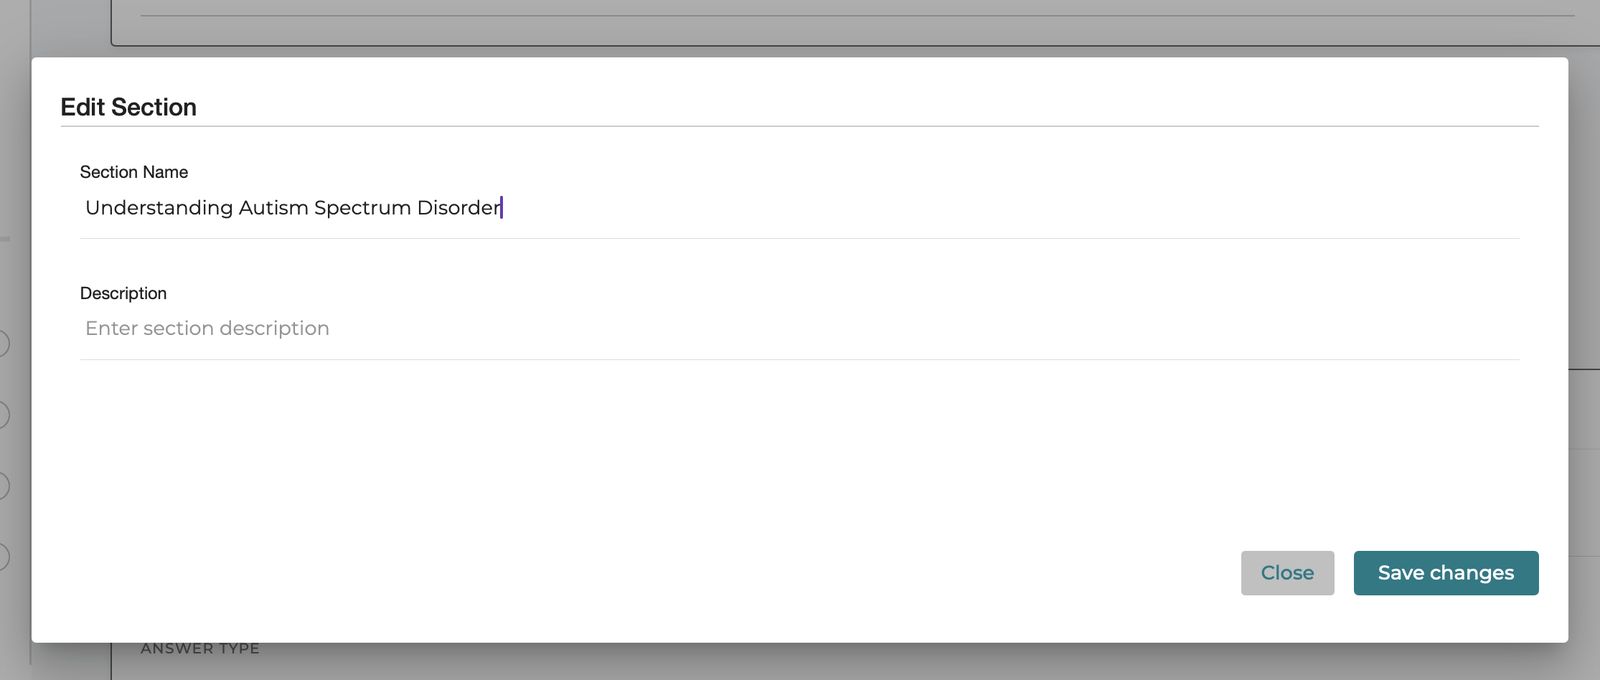
- Click on
Save changes
Questions can be dragged and dropped, enabling you to edit the order of questions in a form.
Advanced Settings
| Settings | Description |
|---|---|
| Points | Enable scoring for questions by assigning points and automatically calculating total scores. For single-select and multi-select questions, you can mark correct answers using weightage assigned to each option. |
| Multilingual | Create forms in multiple languages and allow participants to access the form in their selected platform language(if available) for a localized experience. |
| Conditional Questions | Show or hide specific questions dynamically based on user responses, creating a more personalized experience. |
| Import Questions | Save time and maintain consistency by importing questions from existing forms instead of creating them from scratch. |
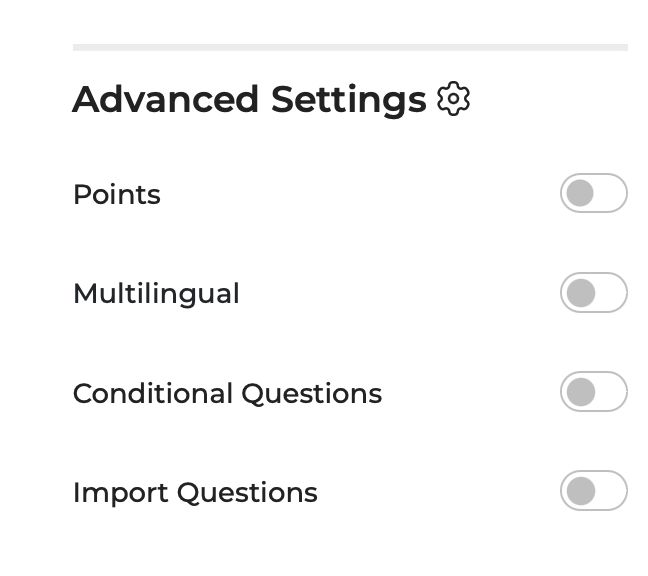
Let’s look at an example for each of these settings:
➡️ Points
Points solves two use use cases, to enable points feature, enable the points toggle:
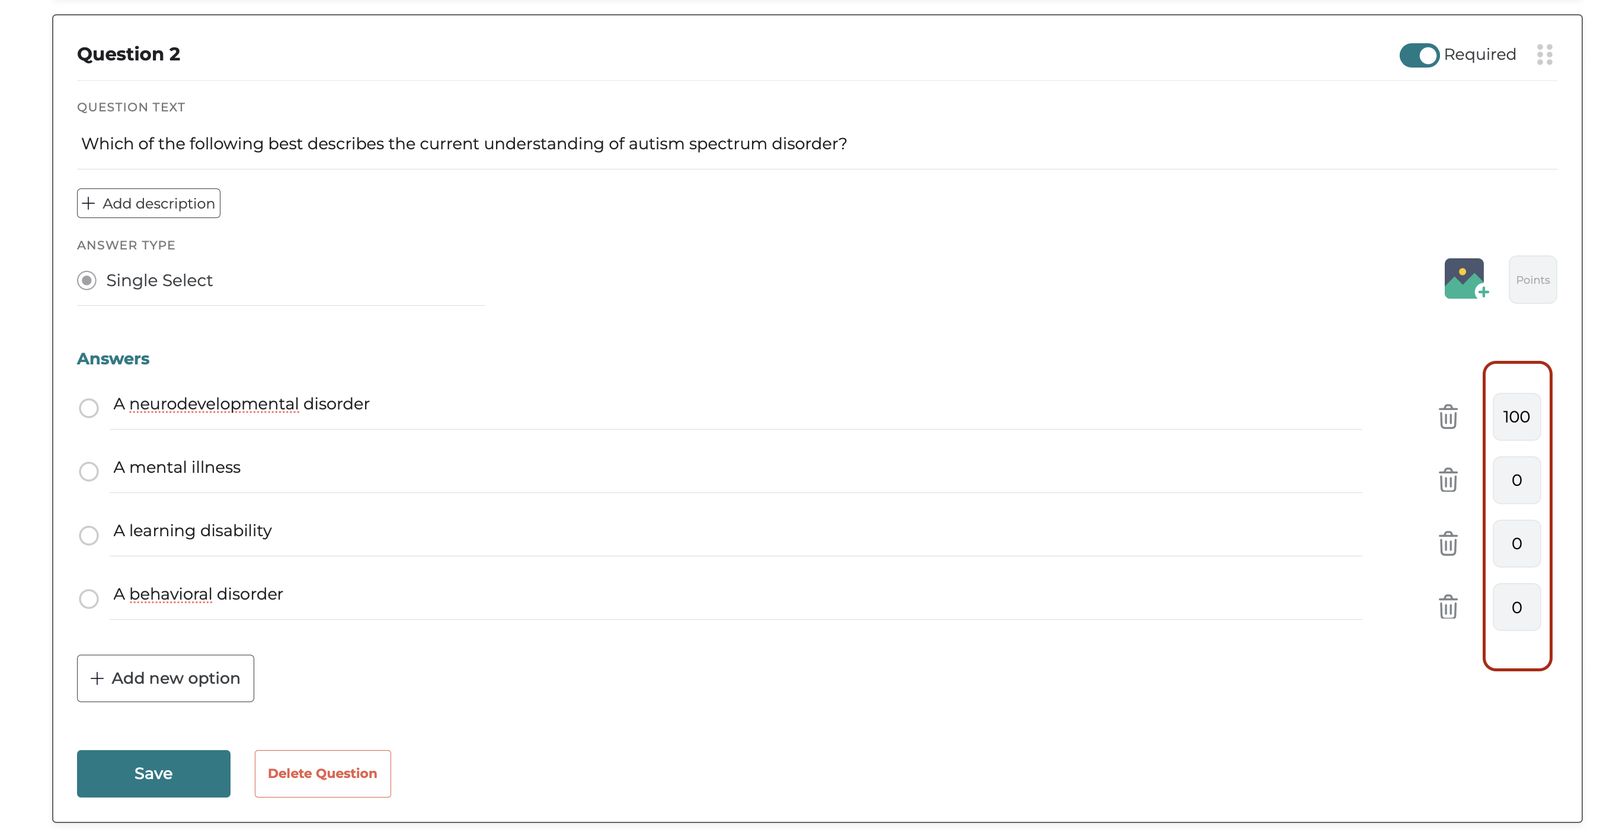
- Assigning weightage to the correct option: For example: In single and multi-select questions you want to assign weightage to the correct option.
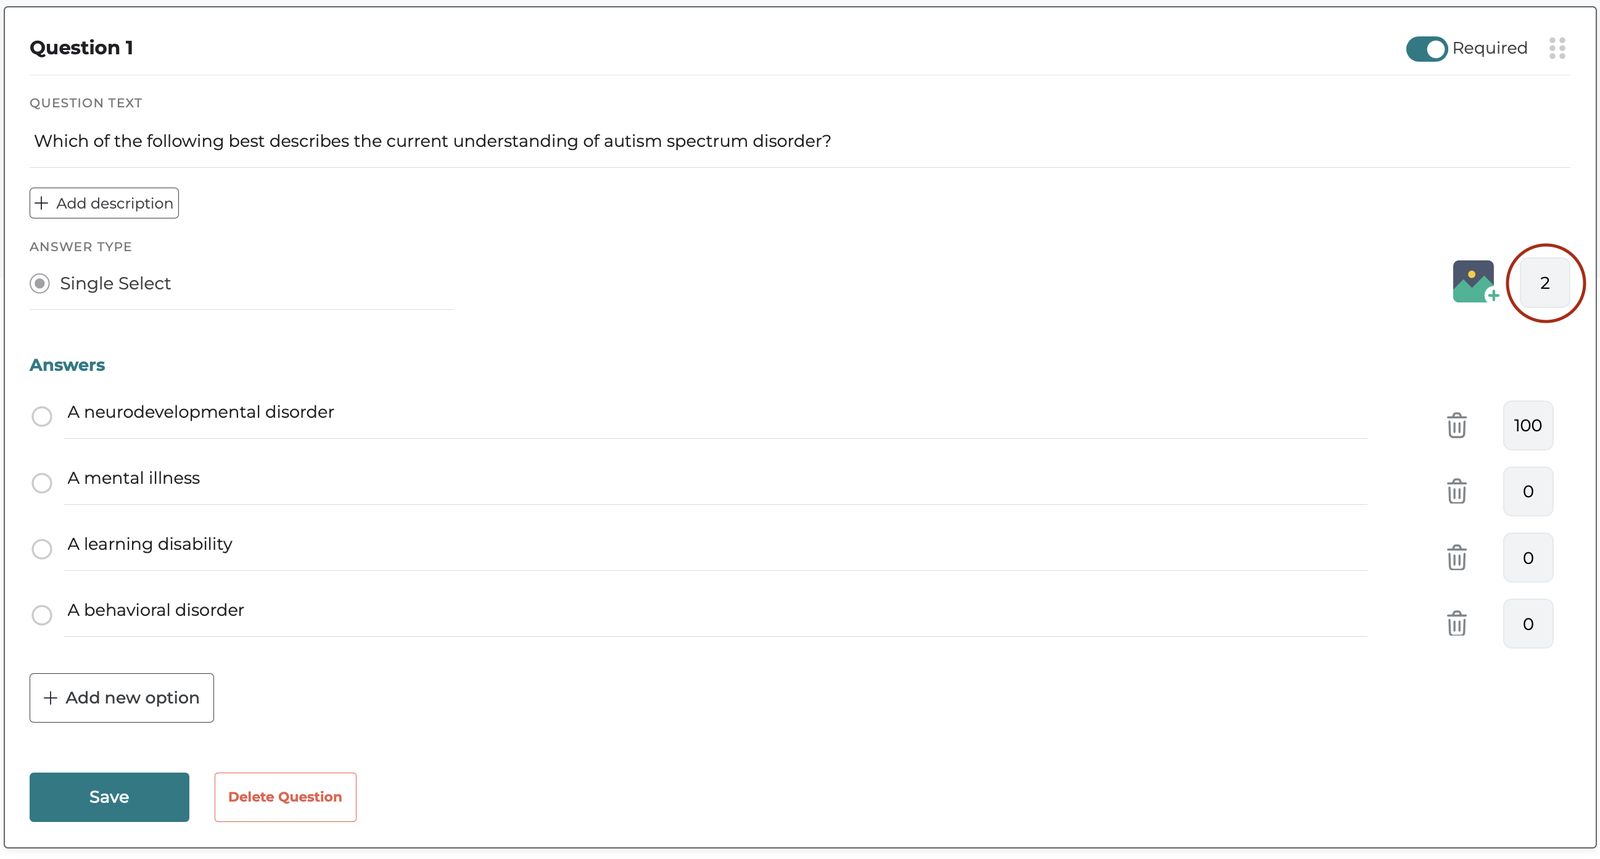
Let’s add a single select question to the form.
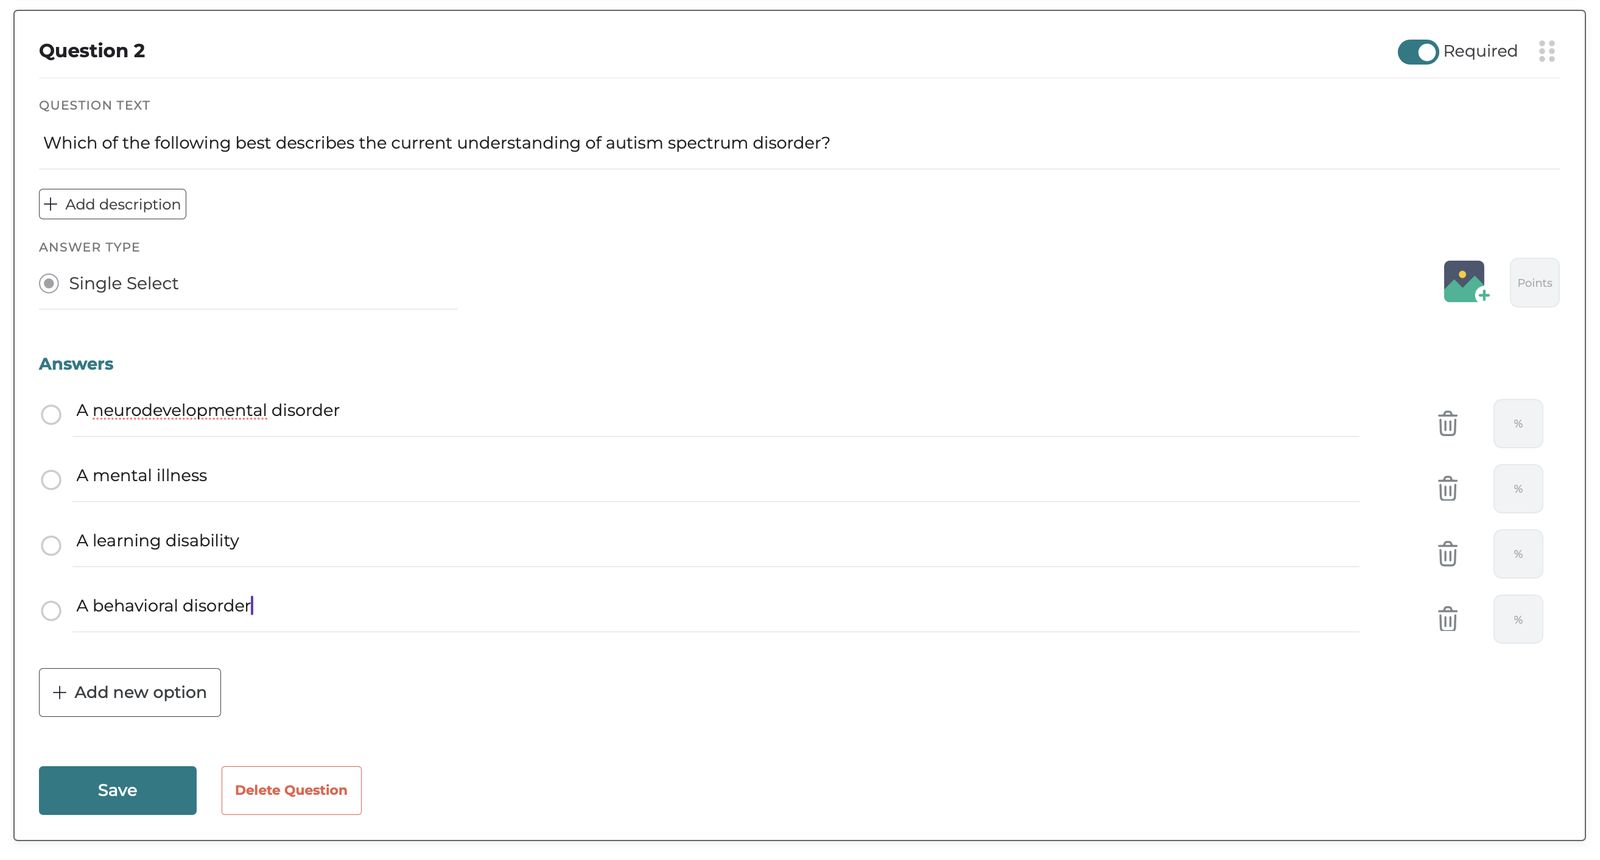
The correct answer is the first option - ‘A neuro-developmental disorder’. To assign weightage to the correct option, assign 100% to this option and 0% to the rest of the three options.
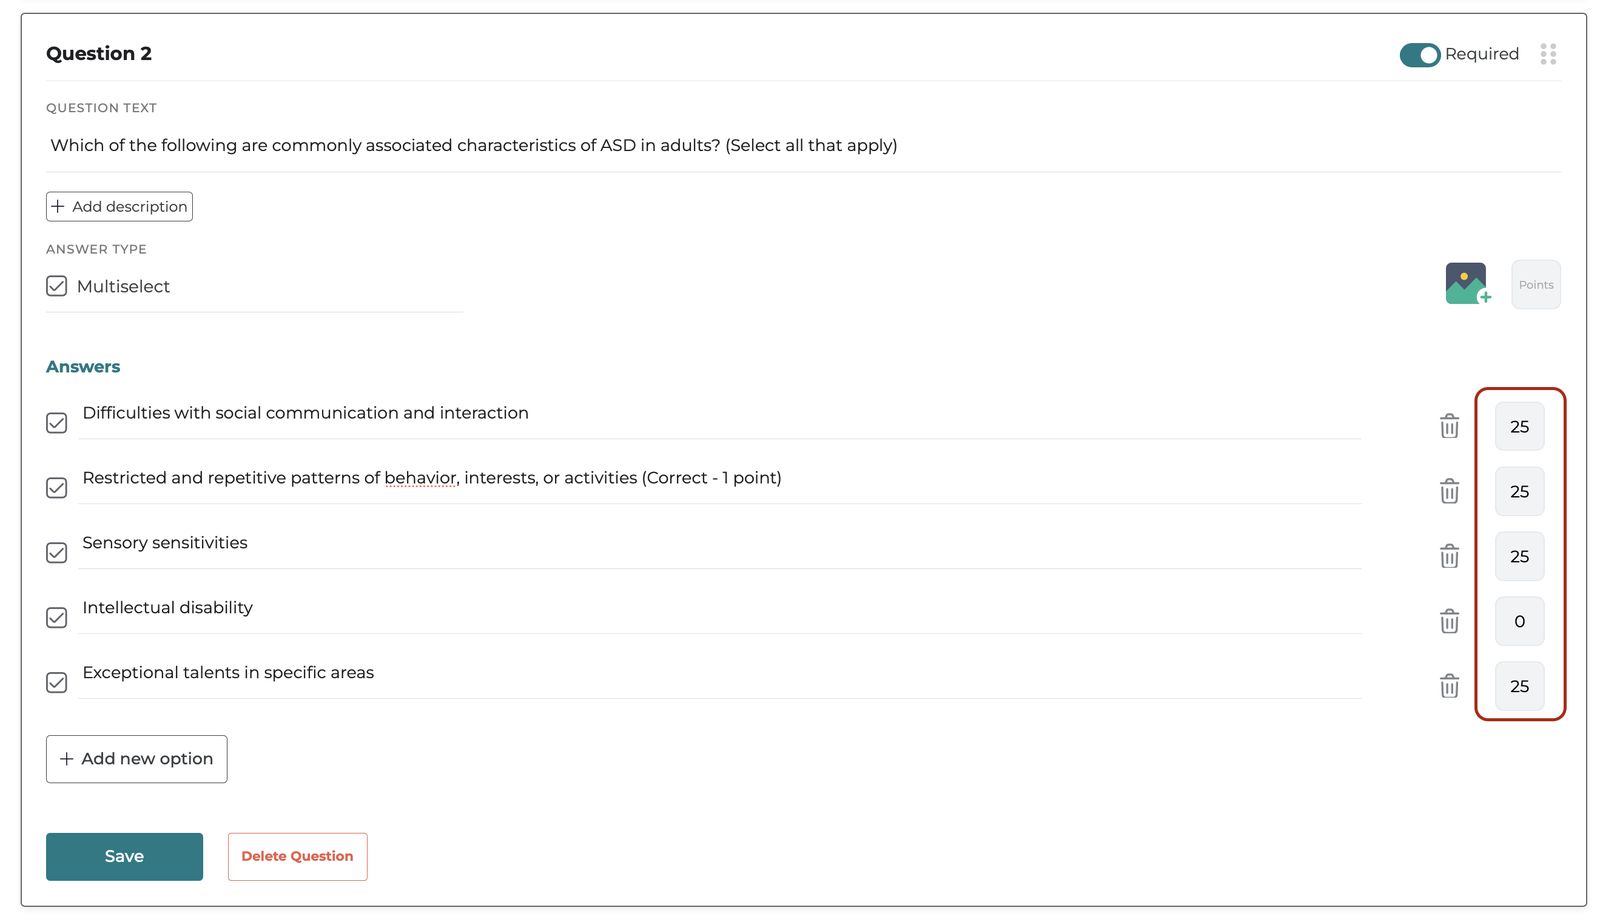
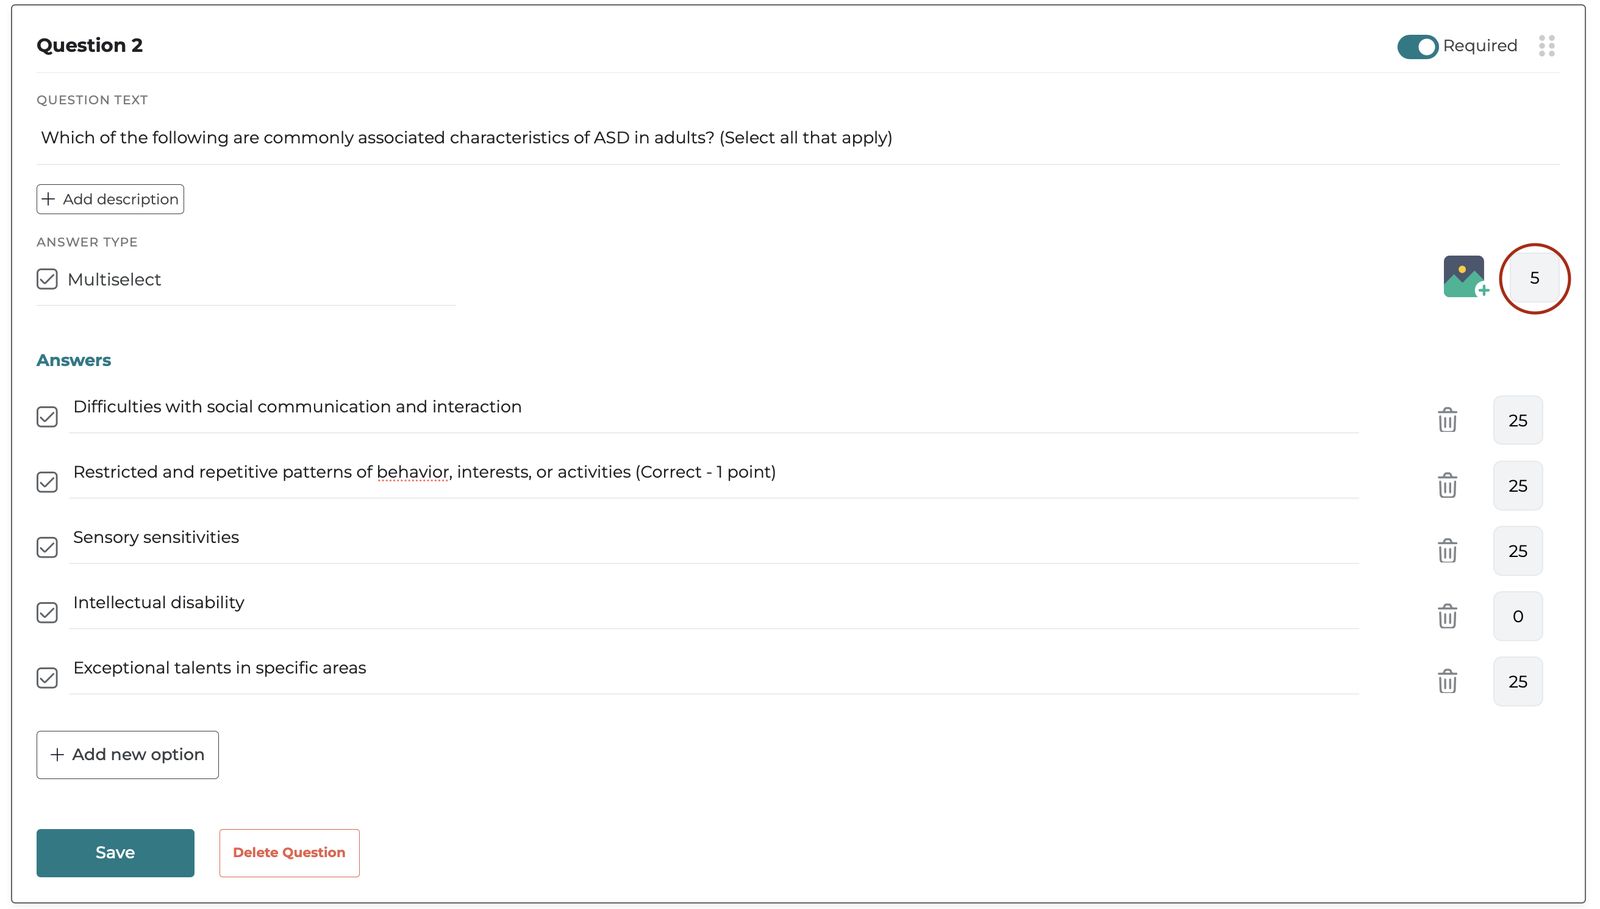
Let’s also add a multi-select question to the form.
Here four out of five options are correct, so we assign 25% weightage to each correct answer.
- Assign weightage to the question: If answered correctly how many points will be allotted to each question.
Example:
If the single and multi-select questions are answered correctly, 2 and 5 points will be awarded respectively.
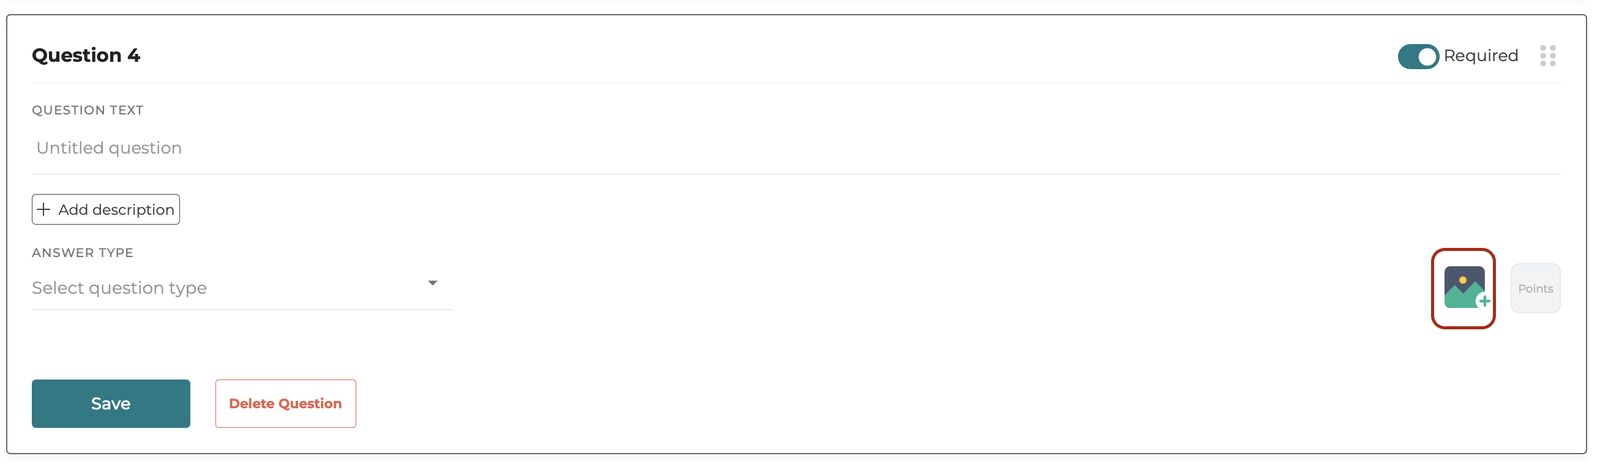
simply, add points to each questions by clicking on the points icon, given right next to the image icon.
🔤 Multilingual
Forms can be created in multiple languages, however the languages needs to be input by the person creating the form. To enable the multilingual capabilities and add different languages, enable the Multilingual toggle.
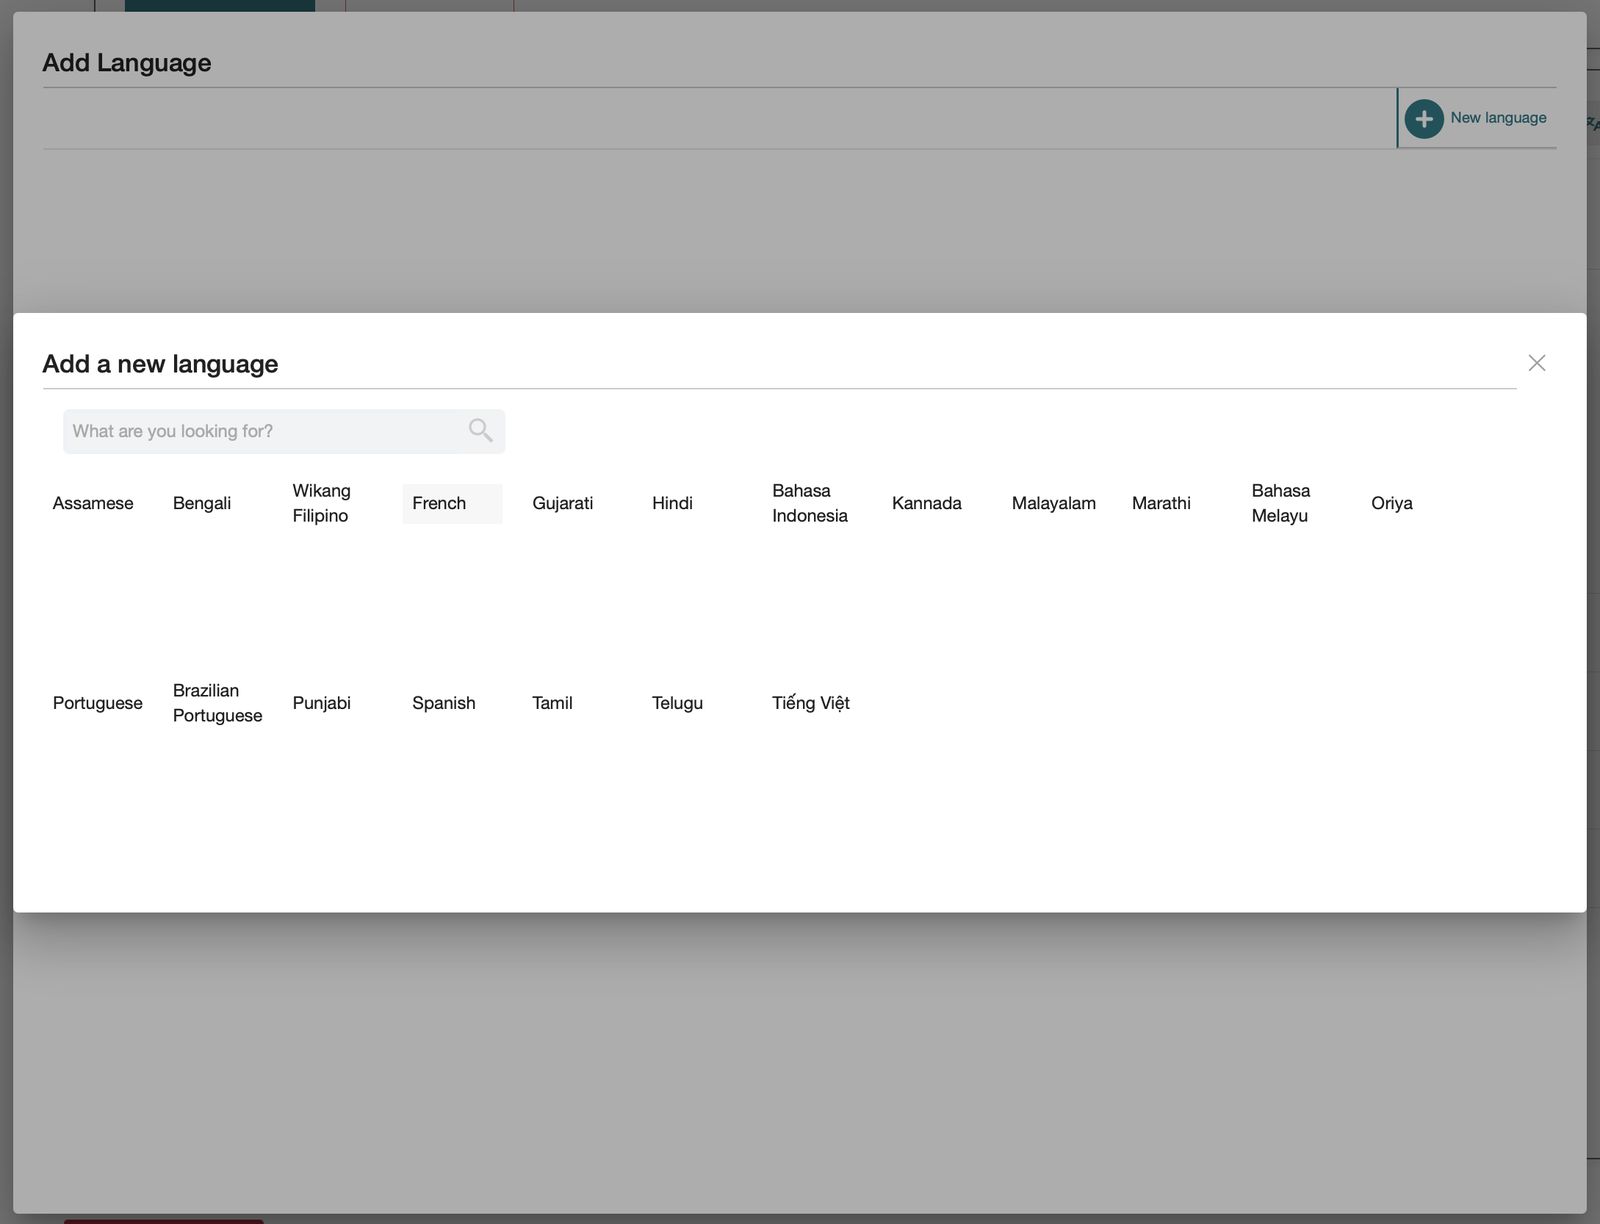
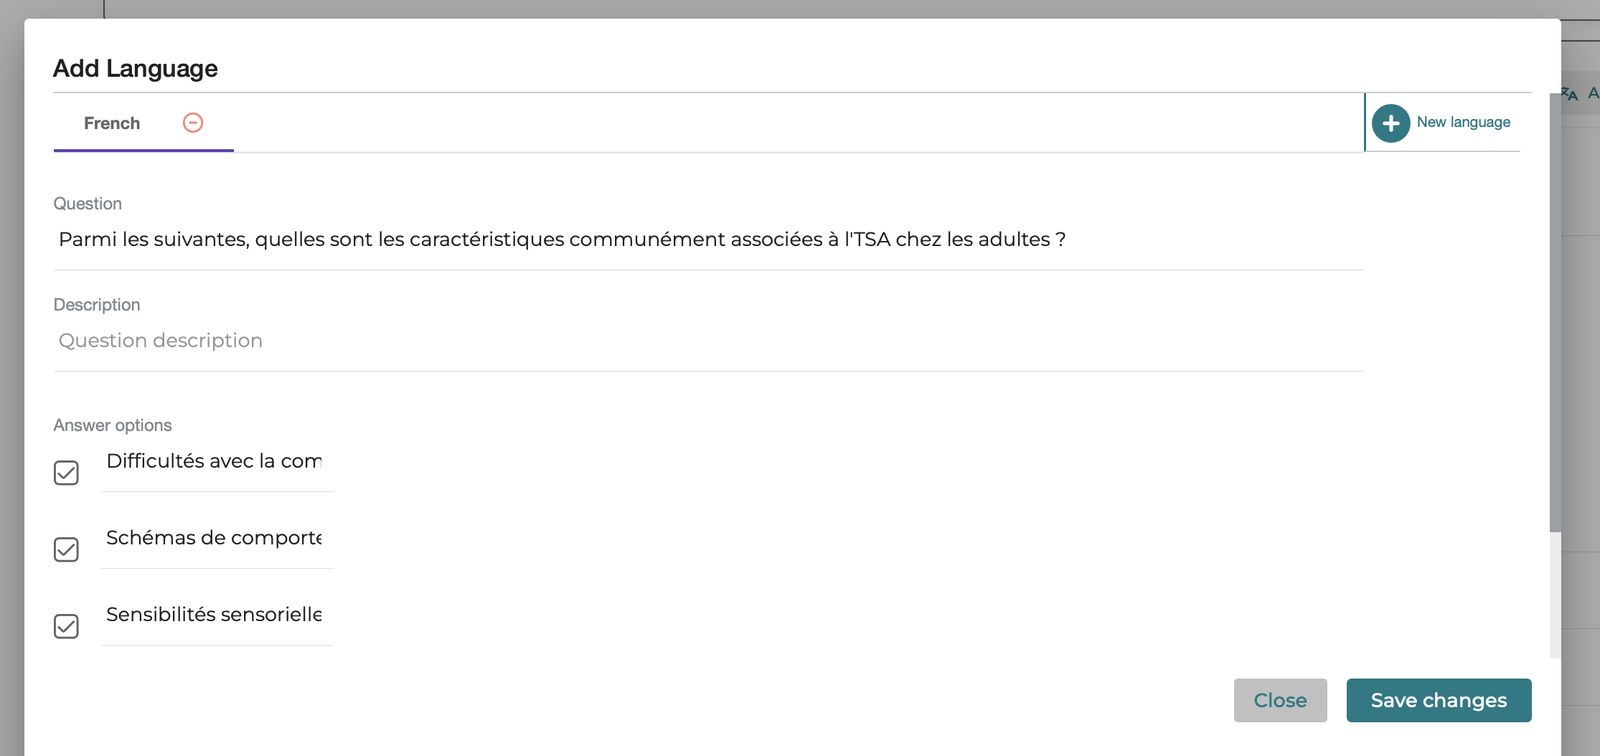
Let’s add the above mentioned questions in French.
- Click on
Add Languagegiven right next to the question. - Click on
New LanguageandselectFrench.
- Input the question and its options in French language.
- Click on
Save Changes.
This will enable respondents to access and respond to the questions in French.
↔️ Conditional Questions
A question that is only displayed to a respondent based on their answer to a previous question. It adds a layer of dynamic logic to a form or survey, making it more personalized and efficient.
- Dependency: A conditional question depends on the answer to another question (the "parent" question). If the respondent answers the parent question in a certain way, the conditional question is shown. If they answer differently, the conditional question is skipped.
- Relevance: Conditional questions ensure that respondents only see questions that are relevant to their situation or previous answers. This avoids asking unnecessary or confusing questions, improving the respondent's experience and the quality of the data collected.
- Efficiency: By skipping irrelevant questions, conditional logic makes the form shorter and faster to complete, increasing completion rates.
- Personalization: Conditional questions allow you to tailor the survey experience to each respondent, making it feel more personalized and engaging.
Here’s how you can add a conditional question:
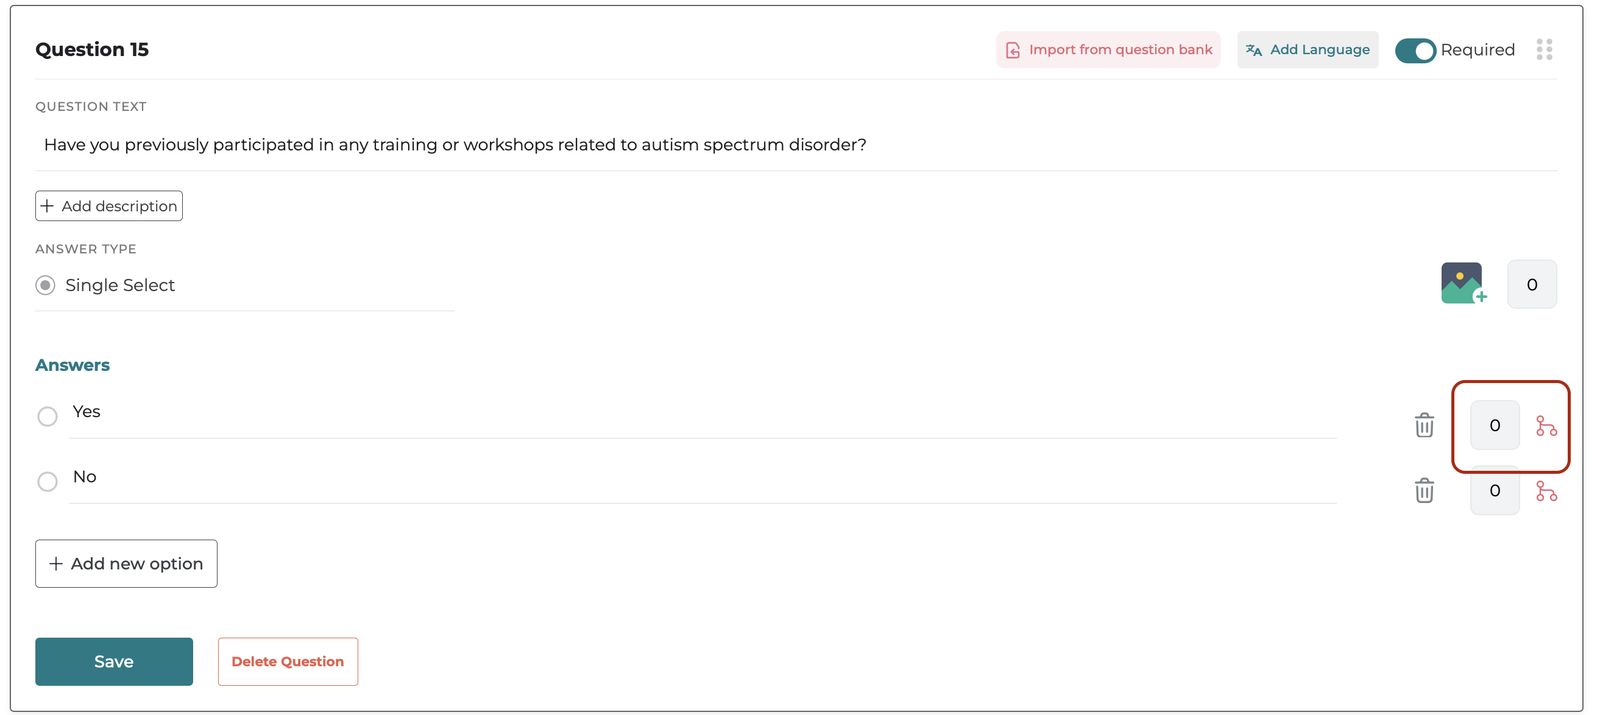
- Enable the
conditional questiontoggle. - Select the option in which you want to add the conditional question and click on the conditional icon.

- Click on
Add New Question. - Add
question textandquestion type, then click on save.
Conditional questions can only be added to single select question type.
⬇️ Import Questions
iECHO enables you to import questions from pre-existing forms across programs and participant groups in an Org.
To import questions:
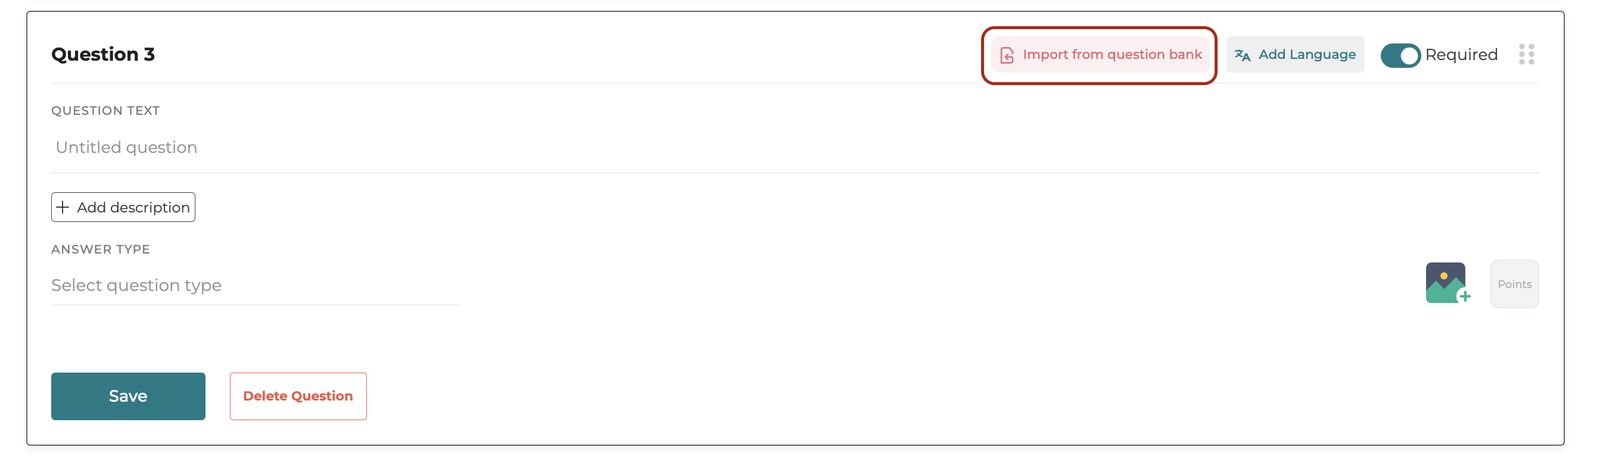
- Enable the
Import Questionstoggle. - Click on
Import from Question Bank.
- A question bank will appear, Select the question you want to import.
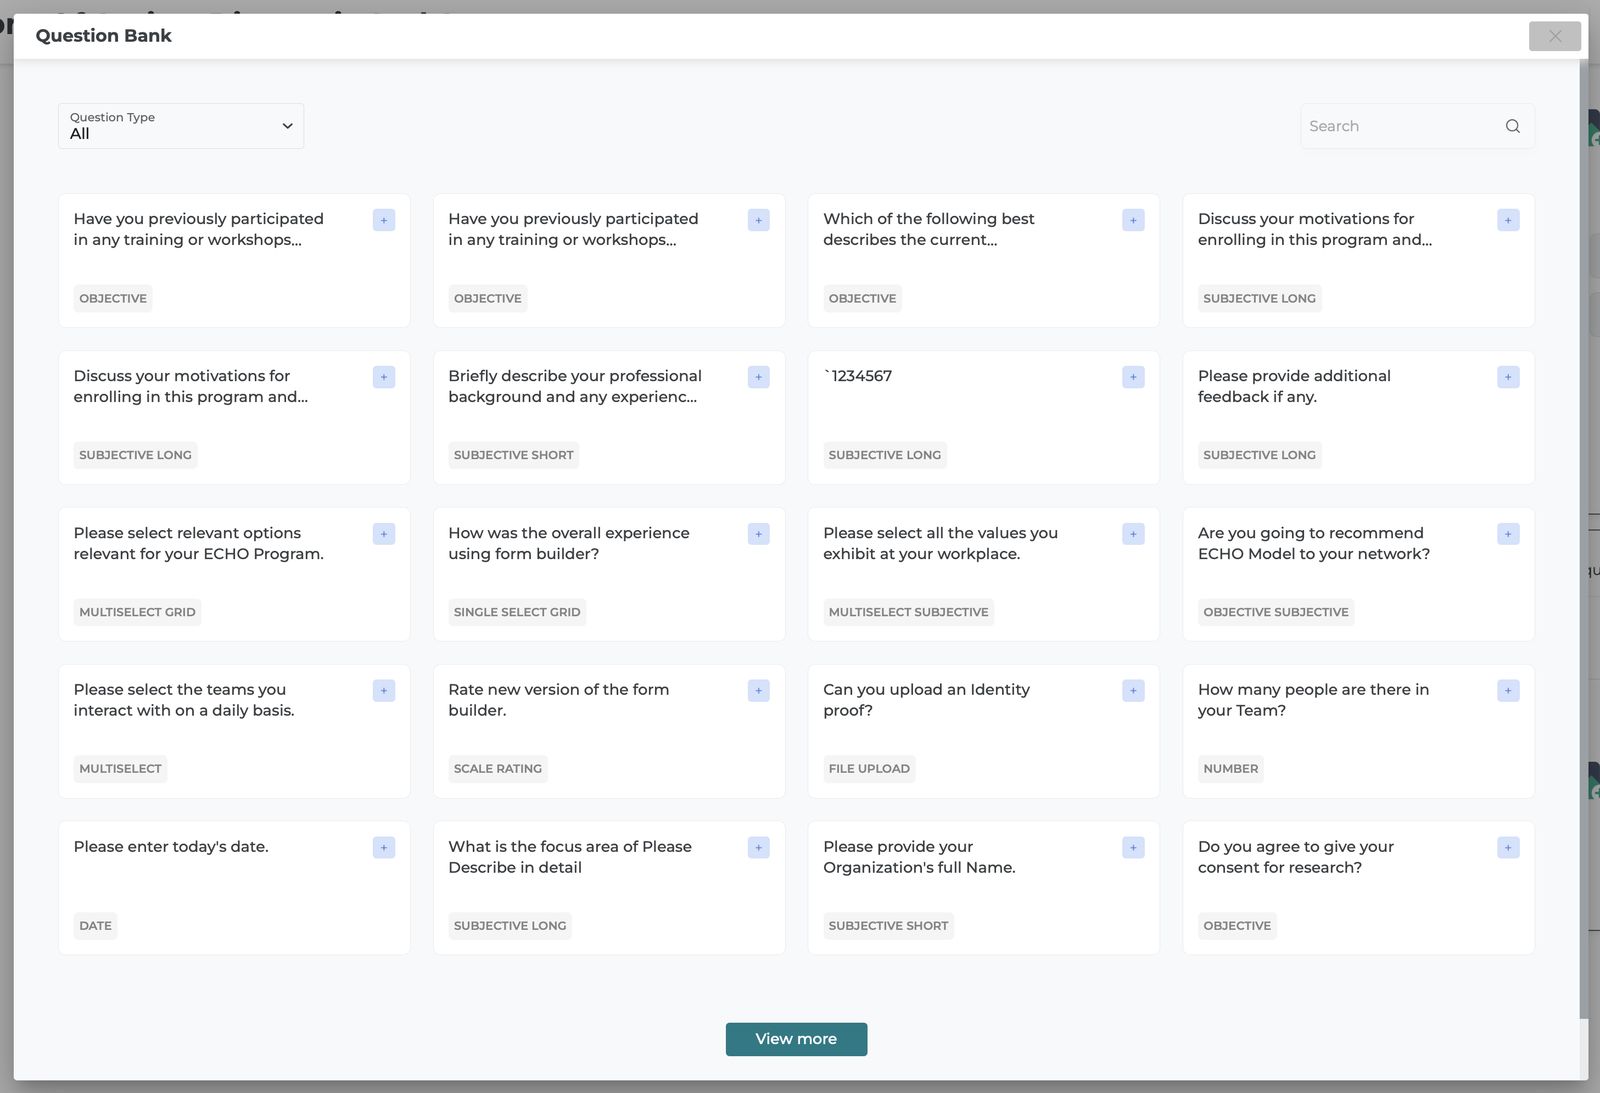
- iECHO will add that question to the form.
You can import questions from across programs, participant groups within an organization.
🚻 Anonymous Form Submission
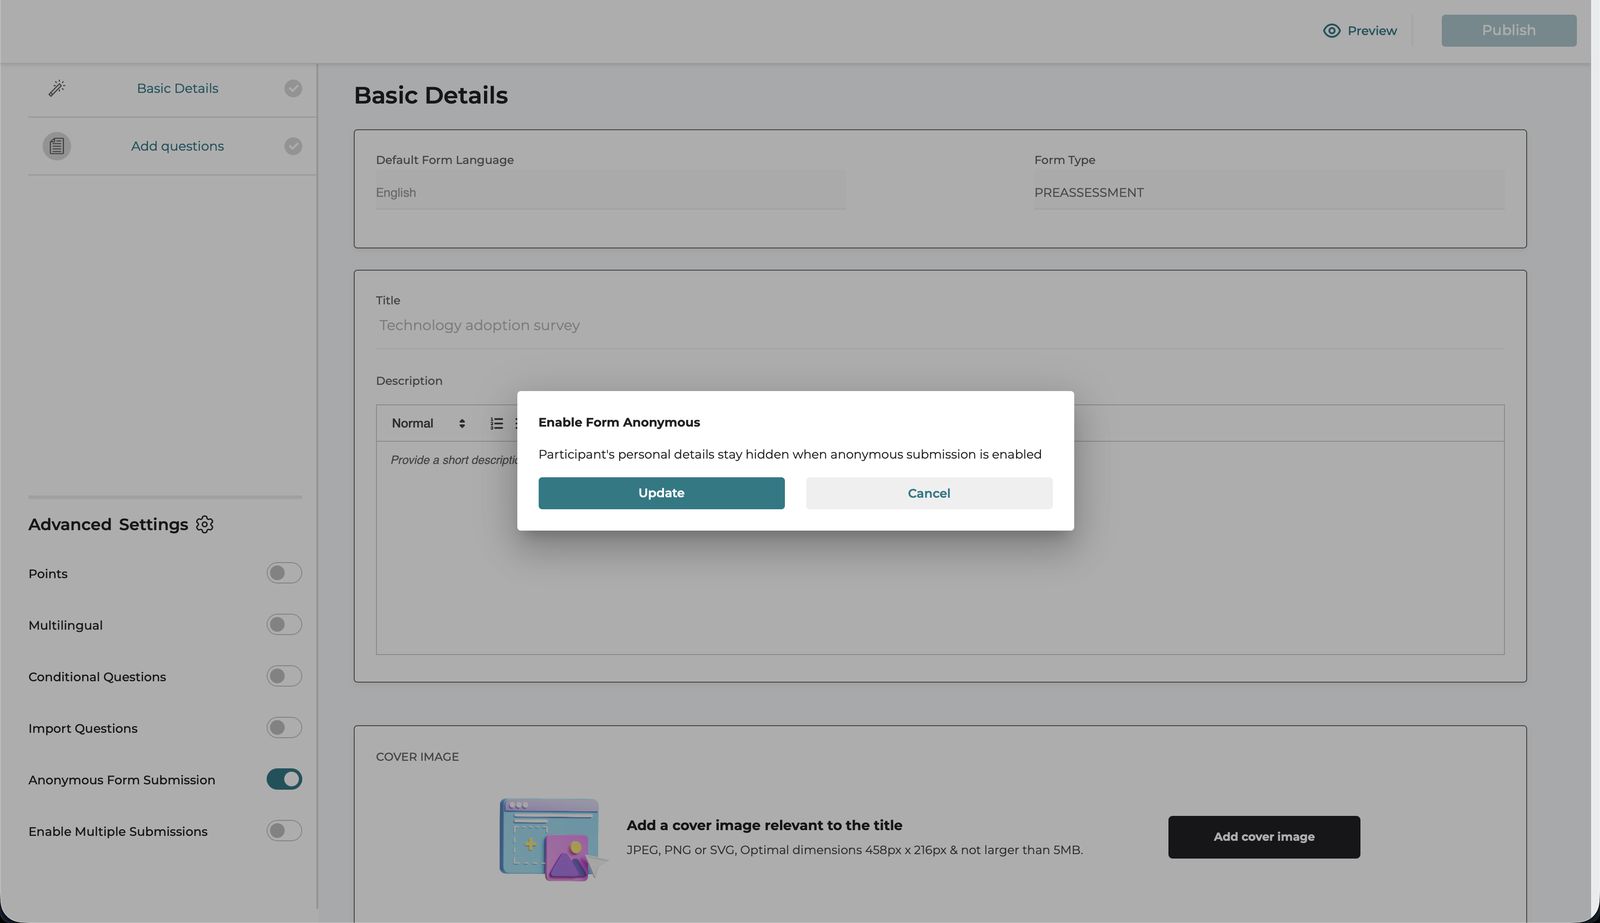
This setting enables you to collect honest, unbiased responses without capturing any participant details. Perfect for feedback surveys, evaluations, and any scenario where objectivity matters.
To enable anonymous form submissions
- Under advanced settings, select
Anonymous Form Submission. - A modal will appear, asking you to confirm - select
Update.
- Continue creating the rest of the form as you normally would.
Note
- Historical data collected while anonymous form submission is enabled cannot be edited to include user information. If you turn off this setting while the form is still active and shared with new participants, it will begin collecting user data.
- Reports generated from anonymous forms will not include user data.
Save and Share the questionnaire
- Once you have added all required questions, click on
Previewto preview the questionnaire. - If required, make the changes and then click on
Publish. - To share the questionnaire, Select the Program and participant group under which you created the form by clicking on
View All Programson the homepage. - Under
Formssection, selectForm Builder and Other Surveys. - Identify the form which you want to share with your participants, Click on the three dot menu given right next to the form and click on
share.

- Now, either
- Share the form directly with participants using the shareable link. Click on
Copy Form Linkto copy the link. or, - Click on
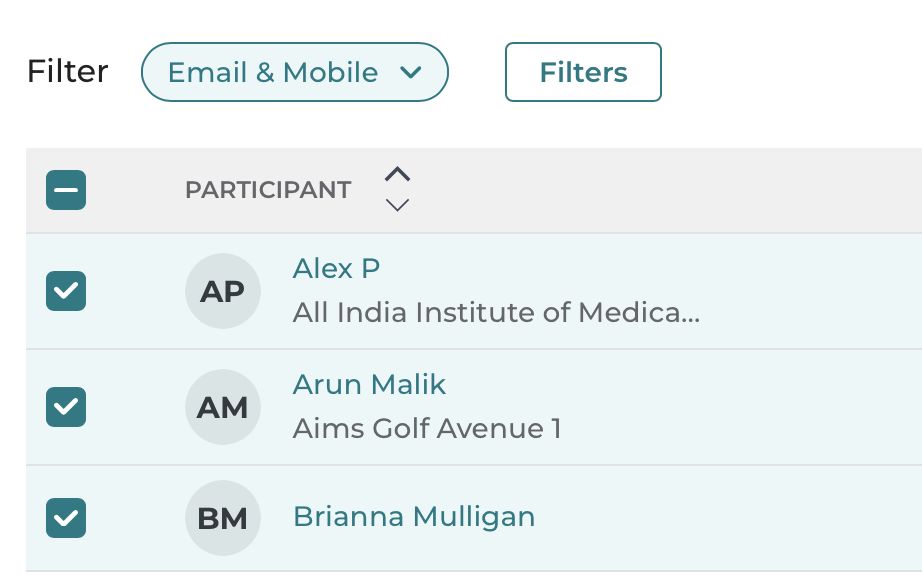
Go to participants, select the participants you want to send the form to and click onShare Assessment.iECHO triggers an email or SMS/Whatsapp (If available in the participants’ location) message with the form link.

Responses
The Responses section captures real-time answers submitted through the form.
To access responses:
1. Click on the Forms tab, select Form Builder and Other Surveys.
- Identify the form you for which you want to view the responses.
- Click on the three dot menu and click on
Manage.

- Click on the
responsestab in the form builder and access the relevant data points.
It provides two key views:
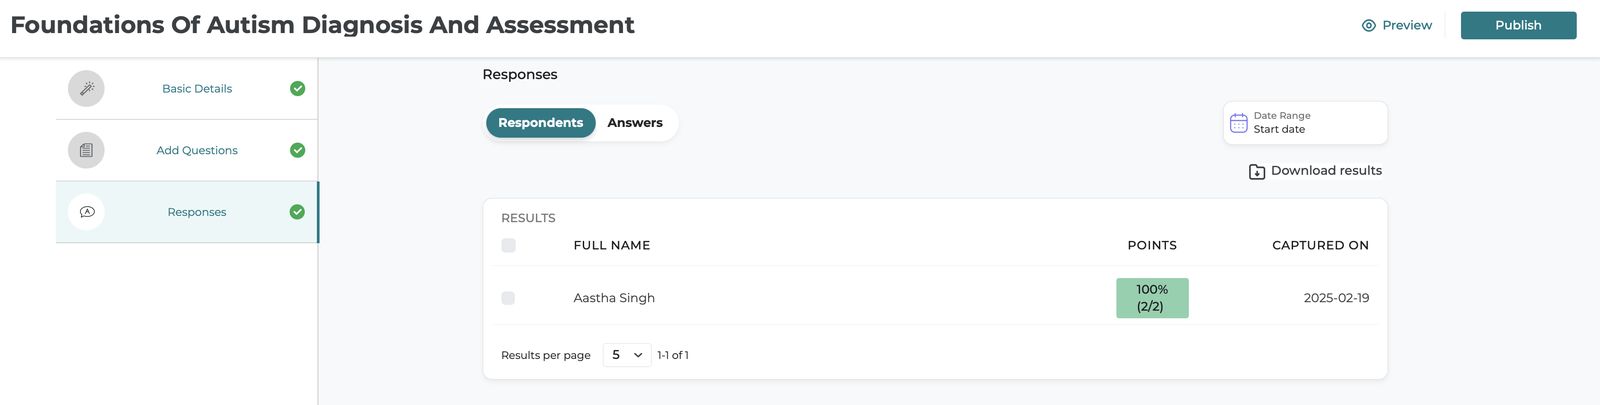
1. Respondents
This view displays a list of individuals who have submitted responses. For each respondent, you can see:
- Their total points (if scoring is enabled)
- The date they completed the form
Clicking on a respondent’s name allows you to:
- Review their detailed answers for each question
- See the marks they scored
- Compare their responses with the correct answers
2. Answers
This view provides a visual representation of answers for each question, along with the correct answer (if weightage is assigned).
How to View Answers:
1. Select the question you want to analyze.
2. Choose a view:
| View Type | Description |
|---|---|
| Conventional | Displays individual answers submitted by each respondent. |
| Graphical | Presents responses in a visual format (Pie Chart or Bar Graph) for easier analysis. |
Review the responses based on the selected view.
Conventional View
To view individual responses of each respondent, click on their name and their answers along with their score will appear.
Graphical Representation
Graphical representation helps visualize response patterns for each question. There are two types:
🔹 Pie Chart – Shows the distribution of responses in percentage. Each segment represents a response option, making it easy to compare proportions.
🔹 Bar Graph – Displays the number of responses for each option as bars. This format is useful for identifying trends and comparing the popularity of different responses.
Create a copy of an existing form
To create a copy of an existing form:
- Click on the
Formstab, selectForm Builder and Other Surveys. - Select
Create Formand select the form type. - Under
Copy Assessments From, select the form you want to create a copy of, the form builder will open in a separate tab. - Make the required edits and Click on
PrevieworPublish, to review the form and publish it respectively. - Follow the same steps mentioned here to share the form.
Enabling and Disabling Forms
iECHO gives you control to enable or disable assessments and surveys, based on your timeline.
- Go to programs by selecting
View Allnext to Programs I Manage. - Select the participant group in which you have created the form you want to disable.
- Click on the Forms tab and then select
Form Builder and Other Surveys. - Locate the form you wish to disable. Under the Status column, use the dropdown to select
Disabled.
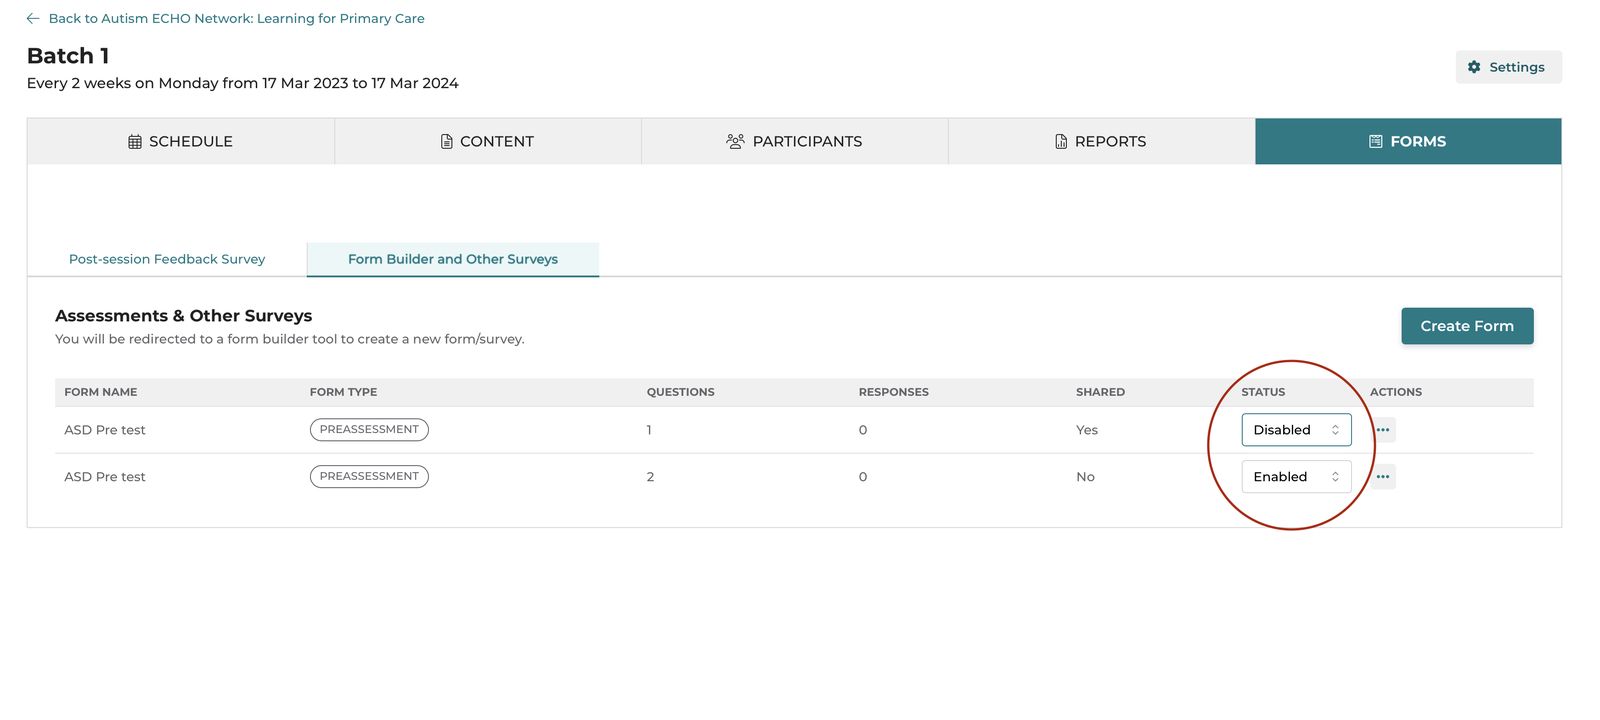
- A confirmation message,
Status Updated Successfully, will appear at the top of the page.
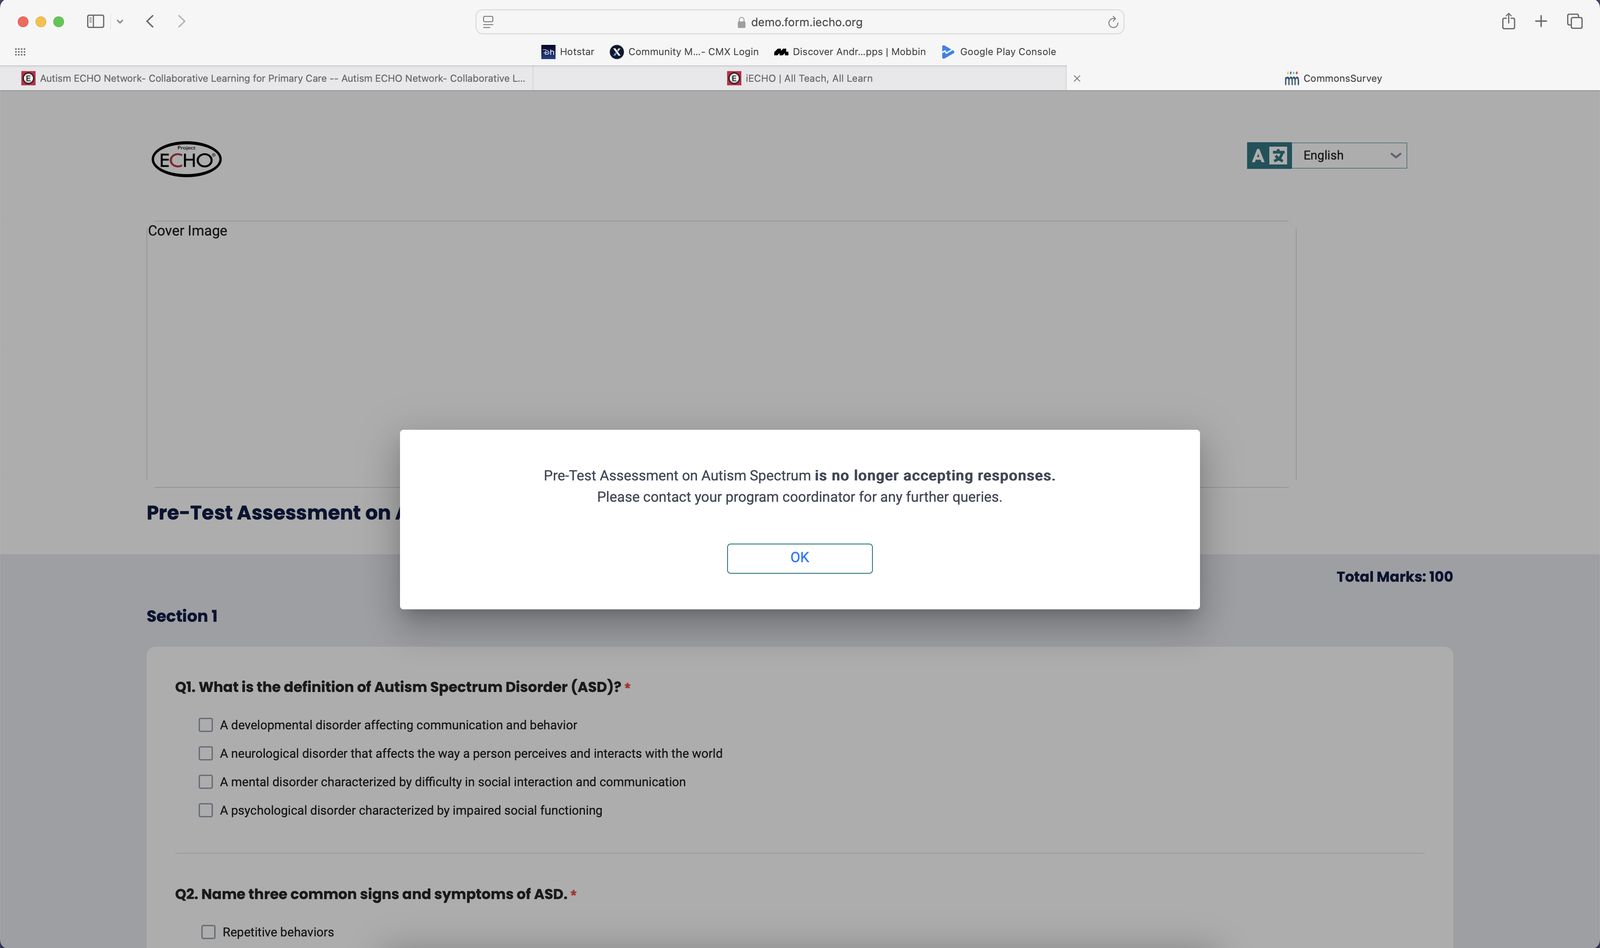
This will disable the form and prevent participants from submitting any more responses. You can now proceed to share the next assessment. If you’d like to enable the form later, you can do so using the same dropdown.
For Example:
Now that the session is over, you want to send out the Post-Assessment Form and disable the Pre-Assessment Form to prevent further submissions.
You’ve created a Pre-Assessment Form for a session titled Diagnosis & Early Intervention in the Master of Science in Autism Diagnosis and Intervention for Adults ECHO program. The session was scheduled for 14th September 2024 from 12:00 - 2:00 PM. You shared the form with all participants ahead of time, requiring them to submit their responses before the session started.
Now that the session is starting you want to disable the form and review their responses. You can do so by following the above mentioned steps.
Which all forms can be enabled or disabled?
Organizations can edit the status of all forms under the ‘Form Builder and Other Surveys’ section, namely:
- Pre Assessment
- Post Assessment
- General Survey
- Case Presentation Form
- Program Registration Form
⌛What happens If a program registration form is disabled?
If a program registration form is disabled, participants will not be able to join the session.
Things to Note
- Anybody who has the view and edit access to a program can create forms.
- Assessments can be created in these languages.
Note: Content must be manually translated and input. Participants can view the assessment in their preferred language or switch languages using the dropdown menu.
- A supportive image can also be added to a question
- Program Registration Forms created by the Organizations must be completed by participants before attending a session. The form appears after registration, and participants cannot attend the session without filling it out.
Overview Videos

iECHO’s Form Builder: Basic Features

iECHO's Form Builder: Advanced Features
FAQ’s (Frequently Asked Questions)
How to change the language of the form?

Is there a way to view the number of responses one has received in an assessment?
The number of responses can be viewed on the Assessments & Other Surveys, against each form. To view, the real-time data refresh the page or select Manage from the three-dot menu.

Can the assessment/form be conducted/shared with invited participants?
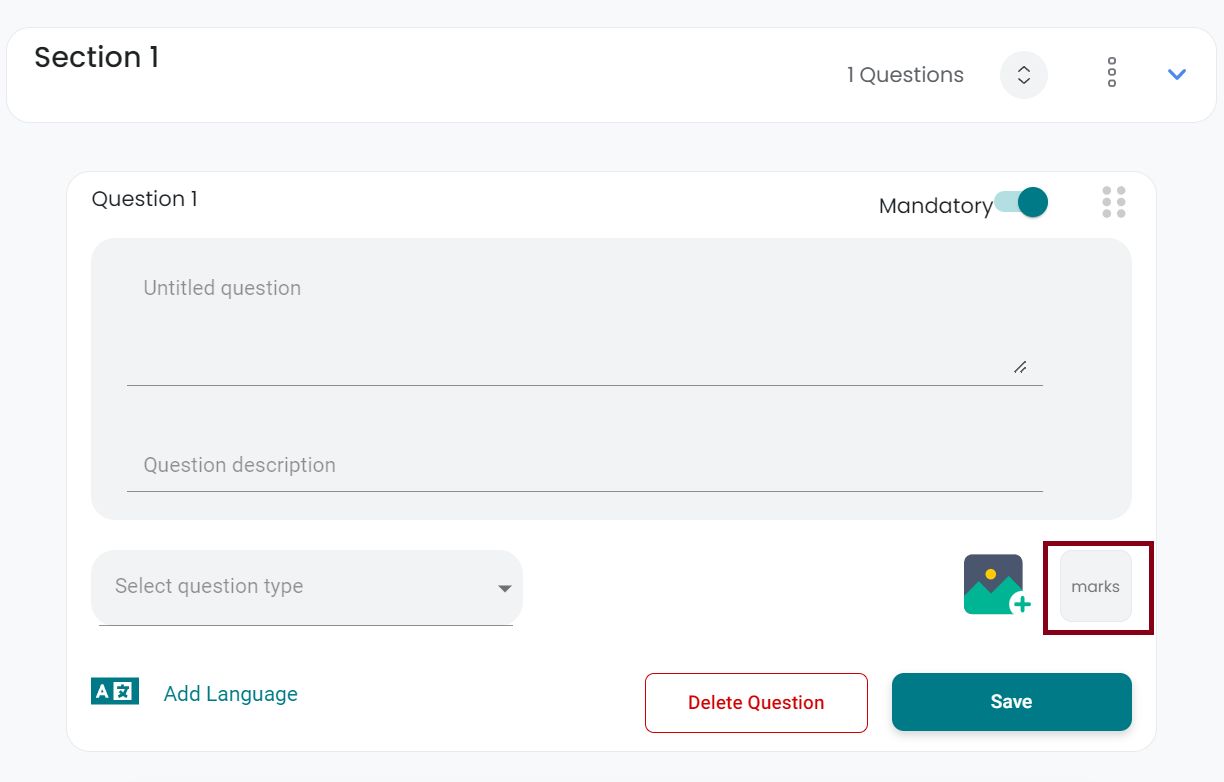
In the form builder, while creating a question:
- Input the question and description.
- Select the question type.
- Click on the small box called ‘marks’
- Assign marks to the question.
- Click on
Save.
Encountering Special Characters in Assessment Reports?
Are you noticing errors in your 'Multilingual Assessment Reports'?
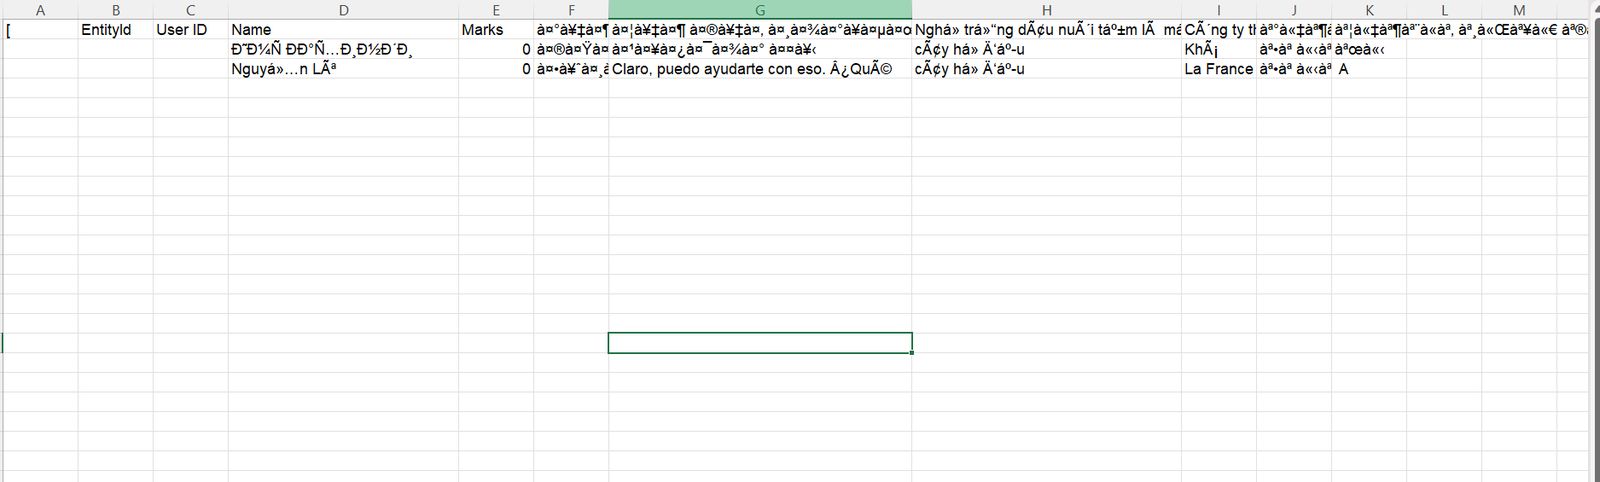
If someone creates a document on a computer with a language version of MS Office, that document might look different when shared with someone else who does not have said fonts installed on their computer. Office programs will substitute the original font with the closest available installed font, which may result in odd spacing between characters. You can add the language you need for the fonts to display correctly.
Learn how to add a language and associated fonts
Is there a way to add visual or image based questions?
Yes, you can select the question type, add the text and click on the image icon and select an image from your laptop that you’d like to add.